Monday, April 29, 2013

TO WALLPAPER OR TO STENCIL? ...THAT IS THE QUESTION!


The powder room, adjacent to M&J's front hall needed help....desperately. Michelle wanted to see WOW when looking to the left upon entering their new home. I was thrilled to comply, as a powder room is open to a myriad of decor possibilities.... you can go bold, bright, cheery or sexy. In fact, the powder room offers an opportunity to deviate from the colour scheme and personal style throughout the rest of your home.  I say go wild!!!


Inspiration can come from many sources. Michelle loved the chartreuse colour on the centre Pinterest board on the left that matched her hand towel on the right. I was totally into the pattern. Wallpaper would have been fabulous, but in a moment of weakness, I agreed to stencil the powder room. Did I mention the room is 4X5'? We both went on line and I found a similar pattern on Cutting Edge Stencils   


Gorgeous overall pattern and looks pretty easy huh?


I think I mentioned the powder room is 4X5'...ya, I think I did. 
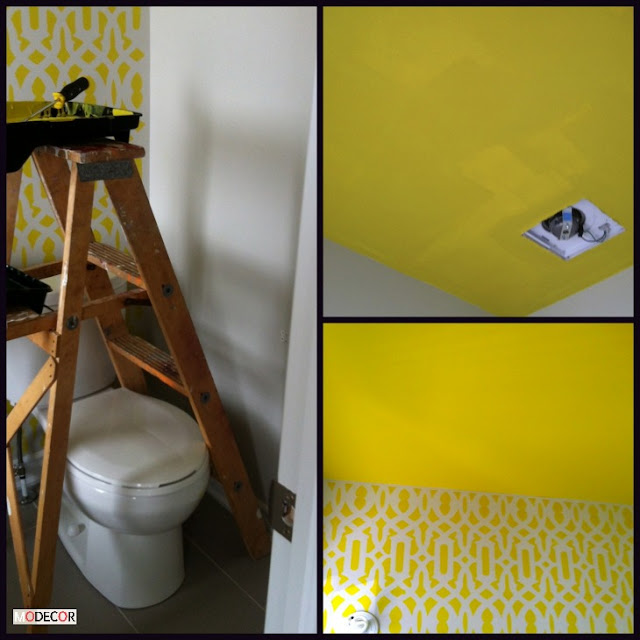
See the photo on the left....that is how the ladder had to be positioned to stencil part of the sink and toilet wall and the wall adjacent. I also had to stencil in between the two walls at every corner, 4 in total, and match the pattern too boot. Did I mention I'm going to be a grandmother in 4 months. I love doing these DIY projects for me or family, but I had not stenciled since 1991... and it was a boarder around my kitchen, not 4 walls. 
Anyway, I started with the ceiling in the same colour I was going to stencil. I used the recommended 'ben' paint from Benjamin Moore.  The chalky builder paint just sucked my paint right up and left a horrible mess. Jordan came to my rescue and bought Benjamin Moore 'Aura' to complete the ceiling in one coat. Yeah Jordan! The bottom photo is the finished ceiling. BTW, good angled brushes are a must for cutting into ceilings etc. I did not tape off the wall to paint the ceiling. 


TWO FULL DAYS LATER.....


I have to say, wallpapering would have been done in 1/3 of the time, but I'm thrilled with my little 4X5'  masterpiece....my back...not so much. 

OK... so what I learned
  • read and follow ALL of the instructions that come with your stencilling package
  • do not think for a second that your stencilling project will be a quick job.....especially if you are doing an entire room and not just a feature wall. 
  • have plenty of rags on hand for touchups, wipe ups and general clean up afterward. 
  • do not plan any strenuous activity that night(s)
  • do have a double scotch after you have reclined for 2 hrs
  • and .... do have another double scotch after you have reclined for 2 hrs
  • do go back the second day with a positive attitude
  • and if your energy is not completely zapped after the job is complete and after you have tidied up your mess, help your children hang up some artwork before you head home. 
  • do have a double scotch after you have reclined for 2 hrs
next up on ' M&J get the house decorated' ...stencilling a backsplash (I cannot believe I just wrote that)


Tuesday, April 16, 2013

EASY BATHROOM WINDOW TREATMENTS...


Dressing the master bathroom windows in M & J's new home was a no brainer. Doing it on a tight budget ... not so much. These new homeowners are spending their hard earned bigger dollars on permanent fixtures and those items that will travel with them to the next home. Smart thinking.  Although custom window treatments can cost up to 30-50% of your decor budget, each homeowner with a designer's help, can decide which windows require custom treatments. This master bathroom is at the back of the house and is a private space. I determined that the window treatments for this space could accomplish all the requirements and not break the bank.

The requirements:  1. must provide privacy  2. must hide an unsightly neighbour's exterior wall 24/7,  and the neighbour's windows behind them  3. must be attractive  4. must be functional when needed


Mission accomplished

The window on the left is non functioning, but faces the neighbours wall which also has a window facing them, but thankfully not directly facing this window. 
Solution:  1. a permanent window treatment that allows for privacy (light tested)  2. hides the wall facing this window  3. is certainly attractive  4. easily removed if need be. 

The larger, side by side window on the right is functional but faces the backyard and eventually their neighbours' back windows. 
Solution:  1. a functioning window treatment that allows for privacy from neighbours behind them
2. hides the view of neighbours' backyards when desired  3. again, is certainly attractive  4. is a functioning 'soft' roman shade that can be adjusted to several heights.


This became a DIY project for me that took 3-4 hours to complete. I used curtain panels from Ikea. I liked the grey swirling pattern which adds some softness to the otherwise linear elements in the space.  The left window treatment is hung from two tension rods, one at the top and one at the bottom. It is more or less permanent, but can be removed quite easily. The functioning window treatment on the left is made form the same fabric. It is attached by velcro at the top, and is manoeuvred the same way as most cloth shades, through a series of rings on the back and cording. 

Now that the privacy issue in this bathroom has been addressed, pretty accessories will follow. 


Monday, April 8, 2013

ARE YOU LIVING IN A FISH BOWL?...


If you are, I would like to introduce you to window film.  The weekend Michelle and Jordan moved into their new house, it was essential that some key windows were covered right away. This is a new subdivision and building is going on all around them, which means contractors, and trades are all around them, which means living in a fish bowl is not an option. The front of their house has a 1/2 glass  front door with two side lights and two identical windows, one in the hall and one in the powder room...all facing the street. Michelle and Jordan wanted to have the light filtered into the front hall, but desperately needed to have privacy. Having these windows professionally frosted was out of the question. We moved on to plan B, which was to apply decorative window film to each of these windows. 

Tools you will need... 1. large flat surface to mark and cut the film  2. a cutting mat to lay on top of flat surface  3. a very long metal straight edge  4. a pencil or pen and ruler  5. an exacto knife with replaceable blades  6. a squeegee  7. cloths to wipe up water drips. 

LEFT: We used Artscape  in the Etched Glass pattern.  TOP: Be sure to carefully mark your cutting line.
BOTTOM: Use a very sharp exacto blade and long straight edge to cut the film.


I wanted to leave a 1/2" border between the edge of each window and the film. I did this for three reasons. 1. If you make a slight boo boo while measuring or cutting, it is easily adjusted while affixing the film 2. it adds interest to the overall look and is more professional looking 3. it allows for peeking out the window if necessary.


It is always wise to follow the manufacturer instructions when attempting something for the first time. This procedure requires that you spray the window with a mixture of water and a drop of soap. I recommend that you do this, but do not soak the window as the film will move around too much. It was also helpful when squeegeeing to spray the outside of the film also. It takes a bit of time to work the air bubbles out, but it is well worth the effort to get a glazed look for a fraction on of the cost. The other great advantage to this method is it is completely removable.


The completed front door, side lights and hall window. Easy peasy, economical and provides the necessary privacy while allowing the hall to remain bright. Ingenious!


Maureen at Modecor Muses: April 2013

Maureen at Modecor Muses